

For quick motion adjustments, please see the Quick Motion Tuning Guide
Advanced Motion Tuning Guide
Introduction to Motion Tuning
The key to getting the best performance and experience from your movement platform is through tuning. Without tuning, the platform might not move enough or moves too much when playing a game. Tuning is essential if you want to create the best possible experience for each game and car and make the platform behave in the way you feel is more realistic or comfortable with your style of racing or flying. Sim Racing Studio (SRS) has created default motion profiles based on the telemetry outputs of each game; however, these don’t take into account the nuances that each vehicle has when it comes to acceleration, braking, cornering, road conditions on many different tracks as well as your specific taste and preferences in terms of immersion in a motion simulator (ie. do you like more or less movement).
Important Tips:
-
Tuning in SRS is always LIVE and you feel the effect of the change immediately after you change a parameter. Once you are satisfied with how the motion feels, press SAVE so it will remember and auto-reload when you get back to the game/vehicle.
-
You can utilize the Profile Manager in SRS for general tuning setting without having to launch the sim. However, for vehicle specific tunings, you will need to load into the specific vehicle in the sim. You can find details on using the Profile Manager here: https://www.simracingstudio.com/post/profile-manager
-
Tuning is disabled when the Profile In Use in the upper right indicates “Stand By”.
-
Once you have loaded a game, the Profile In Use name will change to the game name if supported by SRS.
-
Once you have loaded a vehicle in supported games, the Profile In Use will switch to the name of that vehicle. Not all sims support vehicle specific tunings.
-
If your game is full screen and you can’t see SRS, ALT+TAB out to Windows and select SRS so you can begin to tune. Remember to reselect the game to resume testing once you’re done tuning in SRS.
Intellitune vs Manual Tuning
With the release of SRS v2.9.0.2, a new feature called Intellitune Wizard is available which is an artificial intelligence and machine learning feature that takes into consideration Pro and Community motion profiles to find the best suggestion for settings. Intellitune can be utilized to gather Max Telemetries and basic settings for an improved motion experience over the default motion profiles. Since the telemetry is not manually reviewed, is only 3 minutes long, and limited to a single track, it will not be as accurate as the processes outlined in this guide. If quick setup is the goal, its recommended to utilize the Intellitune Wizard. Please refer to the SRS blog post for more information on the Intellitune Wizard here.
However, if you want the most accurate tuning available for a specific vehicle, this guide will provide the guidance on collecting telemetry and creating a custom motion profile.
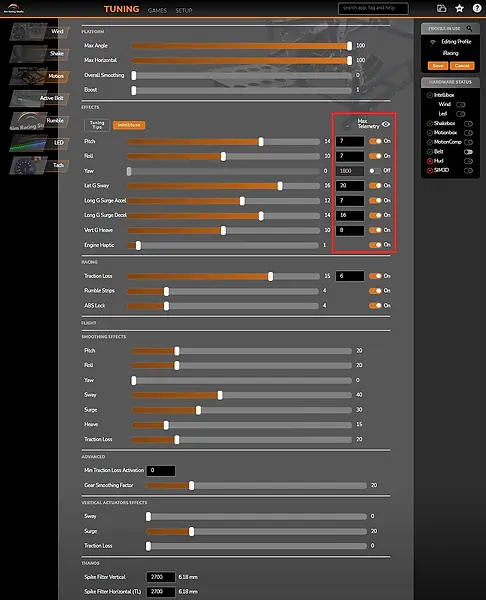
Tuning Page Features
To start tuning, launch Sim Racing Studio 2.0, select TUNING at the top and then Motion in the left column. Below is the definition of each function and feature found in the SRS Tuning page.
Actuator and Non-Actuator Tuning Page Settings
Sim Racing Studio will provide different options depending on the type of motion platform selected in SETUP > HARDWARE > Motion. Essentially, it will be divided into two categories: Actuator and Non-Actuator. There will be some settings available to each type of platform that is not available to the other. This guide will call these features out if they are exclusive to Actuator or Non-Actuator platforms.
Actuator Tuning Page (Examples: PT Actuator, Thanos, Prosimu, SFX100)

Introduction to Motion Tuning
Intellitune vs Manual Tuning
Tuning Page Features
Platform Settings
Effects Slider Settings
Max Telemetry
Smoothing Effects
Advanced Vertical Actuator Effects
THANOS (Spike Filter)
Auto Smoothing Low Speed
What is Telemetry
Understanding the Effects Sliders and Max Telemetry
Capturing Telemetry
Exporting Telemetry
Advanced Telemetry Capturing Tips
Resetting Telemetry
Corrupted and Bad Telemetry
Adjusting Max Telemetry
General Max Telemetry Tips
General Effect Slider Tips
Platform Differences
Advanced Boost Tuning
Reverse/Invert an Axis
Clipping Bad Telemetry
Miscellaneous Tuning Tips
This Advanced Motion Tuning Guide will detail the functions on the Motion Tuning page in Sim Racing Studio, provide information on how Sim Racing Studio uses telemetry, and provides some general tuning tips and theories on advanced motion tuning. Topics include:
Non-Actuator Tuning Page (Examples: DOF Reality, YawVR)

Platform Settings
These settings are applied universally to the motion of the platform independent from the Effects sliders or Max Telemetry settings. Adjusting these settings will change the overall feel of the motion profile.
· MAX ANGLE: This setting adjusts the maximum amount of movement available to the vertical actuators for actuator platforms and the maximum amount of movement for the entire platform for non-actuator platforms. In simplest of terms, it’s a percentage slider. If you have Max Angle set to 100, it will use 100% of the available travel in your platform. Reduce it down to 50, the platform will only move 50% of its potential motion. It will "proportionally" calculate, for each telemetry value, the new actuator/motor position so it’s not a “stop when reaching 50%” type of rule. The lower the value, the less total movement will be achieved. This value is the primary way to reduce overall motion of the platform while maintaining the fidelity of all the other settings.
Note: If you set the Max Angle to 0, the platform will not move from game telemetry. However, if you have an actuator platform, it will move into the "ready" position which is typically mid-stroke on vertical actuator platforms.
· MAX HORIZONTAL: (Actuator Only - Must have horizontal actuators) This setting adjusts the maximum amount of movement available to the horizontal actuators (surge, sway, traction loss) for actuator platforms. It behaves exactly like Max Angle in terms of limiting motion and is only available if horizontal actuators are available.
·OVERALL SMOOTHING: Overall Smoothing will limit how much the platform moves when large changes in direction occur in a very short period of time. Overall Smoothing only applies to these large quick changes; whereas Max Angle and Max Horizontal applies to all motion. For example, when driving straight in a racing sim and you swerve very quick hard to the LEFT and then to the RIGHT:
-
If the Overall Smoothing slider was set to 0, then the platform would move 100% to the LEFT and 100% to the RIGHT.
-
If the Overall Smoothing slider was set to 50, then the platform would move 100% to the LEFT and only 50% to the RIGHT.
-
If the Overall Smoothing slider was set to 90, then the platform would move 100% to the LEFT and only 10% to the RIGHT.
The higher the Overall Smoothing value the less motion there will be in quick changes in telemetry. Too much Overall Smoothing can result in extremely limited motion. If the value is set to 100, during large sweeping motion the platform might not return to center as the return value is too low. This is most noticeable with joystick motion tunings and high-performance aircraft. In addition, actuator platforms can also be impacted by an increase in Overall Smoothing which potentially results in jerky motion in surge and heave (likely a result of the high update rate and capabilities of actuators being limited by the setting).
Important Note: With the addition of Effect Smoothing (See Effect Smoothing section), the usefulness for a global smoothing effect like Overall Smoothing has been minimized. Overall Smoothing can still be utilized to minimize large fast changes in telemetry to avoid jarring/jerky motion; however, utilizing Effect Smoothing, accurate Max Telemetries, and other values has essentially made Overall Smoothing obsolete and remains in SRS for legacy tunings or for those that still utilize its functionality.
· REACTION SPEED: (Only for DOF Reality Platforms) Limits how quickly the motors will move to get to the desired position. For example, you are in a high-speed tight S-curve and the SRS formula has calculated that your platform need to go from position 100% left to 30% right and back to 80% left in a very short amount of time. Reaction Speed at 100 (max and also the default of the platform) will try to reach the new position as fast as possible. Reaction Speed at 70 (the minimum value available) will slightly slow down the speed and thus will be smoother. However, latency can become an issue if performing very quick movements if the Reaction Speed is too low.
Note: Reaction Speed is a global setting and will apply to all motion profiles once changed and saved. For example, if you have one motion profile that has already been saved with Reaction Speed at 70 and are tuning a different game and vehicle and set Reaction Speed to 100, the previous motion profile's Reaction Speed will increase to 100. This is because Reaction Speed is a global setting in firmware and not saved locally via software.
· BOOST: Increases the amount of movement in each actuator/motor when small quick changes in telemetry occur. (Boost is the opposite of Overall Smoothing).
For example, if there was a very small and quick change in telemetry for heave (bouncing up and down with small quick movements) and the platform needs to raise up only 1%, Boost at 0, will move the platform from 0 to +1.0%. Boost at 50, will move the platform from 0 to 1.5%. Boost at 90 will move the platform from 0 to +1.9%. The higher the Boost value the bigger your change in direction for small changes.
Boost can be used to increase the feel of the small details in the road (like bumps from small rocks, minor divots in the terrain, poor road conditions) as well as small bumps from turbulence for flight sims. Boost is completely dependent on if the telemetry output for the sim supports these small changes. Be careful when increasing Boost too much since it can also increase the “jerkiness” of the platform due it constantly shaking.
VERY IMPORTANT: Boost is a global setting and will apply to all axes. If you are only attempting to boost the feel of road telemetry, an increase in Boost will also increase pitch, roll, yaw, sway, surge, and traction loss. It is HIGHLY recommended to utilize the individual Effect Sliders and accurate Max Telemetries instead of using Boost.
See Advanced Boost Tuning below for additional guidance on tuning boost if required.
Note: The minimal value for Boost is 1 as it is a multiplier for increasing telemetry.
Effects Slider Settings
These settings handle how much travel and how predominant the motion is on each axis (pitch, roll yaw, sway, surge, heave, and traction loss). They will determine how much surge you feel when accelerating or braking, how much roll occurs while on a banked curve or while banking in an aircraft, how much sway occurs during fast cornering, or how much heave is felt from bumps on the road.


· PITCH – Pitch controls how much the platform pitches up and down based on the angular position of the vehicle. For racing, it will be how much the platform rises and falls as it goes over hills, jumps, or anything that will raise or lower the front end of the car. For flight, it controls the pitch of the platform based on the angle of the aircraft as it climbs or dives. If you are climbing to gain altitude, doing a loop, taking off from a hill, Pitch controls how much the platform will pitch up and down. Pitch is the angular position of the vehicle on the pitch axis.
· ROLL – Roll controls how much the vehicle will roll side to side. The angle of the vehicle from side to side vs the horizon. This would be felt while in a vehicle and on a banked curve, driving on the side of embankment, or rolling during a crash. For aircraft, its when a banked turn occurs or whenever the pilot rolls the aircraft. Roll should not be confused with Lat G Sway which is the lateral g-forces felt when going around a curve. Roll is the angular position of the vehicle on the roll axis.
· YAW – The twisting movement when you use rudders in an aircraft/spacecraft without rolling or pitching. Yaw represents the platform pivoting on a central axis. Generally used for aircraft, especially helicopters. Note: Depending on the sim, Yaw can be driven by either g-forces on the yaw axis (angle rate which is typical for most flight simulators) or the positional representation of the vehicle within 360° on the yaw axis (compass heading (ie: 0 = North, 90= East, 180 or -180 = South, -90 = West)) which is typical for most racing simulators). Tuning for yaw should take this into consideration.
· LAT G SWAY - The lateral g-force affecting the vehicle (Sway). This would be felt when you are on a high-speed curve and your car is being "pushed" to the outside of the curve or when you are on the track warming up the tires with sudden left and right movements in the steering wheel. Sway is what will move the platform from side to side. Sway is not as predominate a force in aircraft as it is in road vehicles.
· LONG G SURGE ACCEL - Long G Surge Accel (aka Surge Accel) controls how much the platform will pitch backwards or surge forward (for actuator platforms with a surge actuator) during acceleration. For racing, this is the primary effect when you accelerate, take off from the start line, and feather the throttle. For flight, it’s the feeling when taking off from the runway, launching from an aircraft catapult, or engaging the afterburner. If more platform movement is desired when accelerating, increase the Long G Surge Accel slider towards 20.
· LONG G SURGE DECEL - Long G Surge Decel (aka Surge Decel) controls how much the platform will pitch forwards or surge backwards (for actuator platforms with a surge actuator) during deceleration. For racing, this is the primary effect when you brake, shift gears, or crash head on into a wall. For flight, it’s the feeling when braking on the runway, using air brakes, or crashing straight into the ground. If more platform movement is desired when decelerating, increase the Long G Surge Decel slider towards 20.
Important Note: Long G Surge Accel and Long G Surge Decel work together to provide the feeling of acceleration, braking, and gear shifting. This is because there is only a single value for surge that is either positive or negative value. (Long G Surge Accel is POSITIVE surge telemetry and Long G Surge Decel is NEGATIVE surge telemetry). The larger the values of the Accel and Decel slider, the more the platform will need to move during a gear shift or braking event. This is due to a larger value of the Accel slider pitching or moving the platform in one direction at a larger distance while the larger value of Decel is pitching or moving the platform in the opposite direction at a larger distance as well. The acceleration, braking, or gear shift event still needs to happen in the same amount of time; however, there is now more distance for the platform to move. This can result in jarring or jerky motion. A balance between the two sliders is key to a good motion profile for surge and those values are completely dependent on the vehicle and sim. The tuner will need to find the balance and adjust the sliders accordingly. Use of Gear Smoothing Factor will help to eliminate the jarring motion during gear shifts.
Note: Long G Surge Accel and Long G Surge Decel had to share the SAME Max Telemetry value in SRS prior to version 2.20.0.1. Ensure SRS is updated to this version or higher to utilize this surge information in this guide.
· VERT G ROAD HEAVE - The vertical g-forces affecting the vehicle (Heave). For a car, this would be the road texture and bumps. For planes, it would be felt in turbulence or when you hit the ground. Heave also includes transitions in both inclines and declines of the vehicle position. Affects both cars and planes in similar ways.
· ENGINE HAPTIC - An effect created within Sim Racing Studio that represents the engine shake from a vehicle if the RPM telemetry is available. The Engine Haptic effect will create a shaking effect in the platform from the actuators/motors and the strength of the shaking is handled by the Engine Haptic Effect Slider. Note: This effect is different than the Engine shake effect available to transducers/shakers via the Shake Tuning in SRS which uses sound waves for the effect.
Max Telemetry
Max Telemetry tells SRS when to move the platform on a specific axis to its maximum amount of potential movement. For more information, see the "Understanding the Effects Sliders and Max Telemetry" section below.
· MAX TELEMETRY - The numerical value in the black box tells SRS when to move the platform to its maximum potential movement, the Effect Slider allows you to tune that motion against all the other axes. See the "Understanding the Effects Sliders and Max Telemetry" section below for more information.
· EYE ICON - A shortcut link that will take you directly to the GAME > Telemetry page of SRS in order to Capture or Export game telemetry.
· On/Off SWITCH - A switch that will allow you to turn On or Off a specific axis. If Off is selected, that specific axis will not move from telemetry when motion is active.
Racing
· TRACTION LOSS – The force when the back part of your car is rotating quicker than the front part. For traction loss, the platform will pivot on a front axis so only the rear of the platform moves. Examples would be when you are drifting or losing control of the rear. Generally only for cars and usually not for aircraft.
· WHEEL SLIP/LOCK – An effect created within Sim Racing Studio that represents the Wheel Slip or Lock for each individual wheel on the vehicle if the telemetry is available. Wheel Slip occurs when tires spin with no traction independent if the car is rotating or completely standing still (slipping). Wheel Lock occurs when the car is moving but tires are not moving (locked). Note: Not all games support Wheel Slip/Lock. Please refer to the SRS blog post for supported titles here.
· RUMBLE STRIPS - An effect created within Sim Racing Studio that represents individual wheel shaking for when that specific wheel encounters a rumble strip. The effect strength is not impacted by speed; however, it can be adjusted using the Effects slider. Note: Not all games support Rumble Strips. Please refer to the SRS blog post for supported titles here.
· ABS LOCK - An effect created within Sim Racing Studio that represents the shake that can occur with Anti-Lock Brakes if the telemetry is available. Note: Not all games support ABS Lock. Please refer to the SRS blog post for supported titles here.
Flight
These effects are created exclusively by Sim Racing Studio and are based on actions within the sim. See SRS Blog post here for more information.
· AFTERBURNER - (Telemetry based) An effect created within Sim Racing Studio that represents the shake that can occur when an afterburner is engaged. This effect requires the simulator to export telemetry that the afterburner has been engaged and is not available for all flight sims.
· CANOPY - (Telemetry based) An effect created within Sim Racing Studio that represents the shake that can occur when the canopy on an aircraft is closed. This effect requires the simulator to export telemetry that the canopy is closing and is not available for all flight sims. It is recommended to leave this value at a lower number to avoid excessive shaking.
· LANDING GEAR - (Telemetry based) An effect created within Sim Racing Studio that represents the shake that can occur when the landing gear is lowered or raised. This effect requires the simulator to export telemetry that the landing gear is up or down and is not available for all flight sims. The effect is queued when the landing gear is deployed or raised and may not match the exact length for the gear deployment.
· CANNON FIRING - (Button Box/ Joystick Shortcut based) An effect created within Sim Racing Studio that represents the shake that can occur when firing the cannons or guns in a flight sim. This effect requires a Joystick button short to be created that will shake the platform whenever the button is pressed. This effect continues as long as the user holds down the button shortcut for the cannon firing effect and is not related to any in-game telemetry (ie. this effect can continue to occur even if the vehicle has no ammunition). See the SRS Blog post above for information on creating a Joystick shortcut.
· MISSILE FIRING - (Button Box/ Joystick Shortcut based) An effect created within Sim Racing Studio that represents the shake that can occur when firing a missile in a flight sim. This effect requires a Joystick button short to be created that will shake the platform whenever the button is pressed. This effect continues as long as the user holds down the button shortcut for the missile firing effect and is not related to any in-game telemetry (ie. this effect can continue to occur even if the vehicle has no missiles). See the SRS Blog post above for information on creating a Joystick shortcut.
Smoothing Effects
Smoothing Effects is the ability to average telemetry over time that helps to reduces telemetry spikes specifically to Pitch, Roll, Sway, Surge, Heave, or Traction Loss. This targeted smoothing will only be applied to the adjusted axis and will not impact the all motion like the Overall Smoothing.
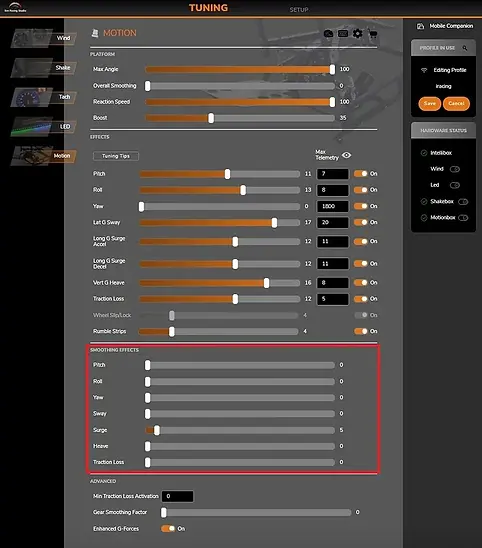
The values can be set from 0 to 100 exactly like the Platform Smoothing slider. 0 will turn smoothing off; whereas, 100 will be maximum Smoothing for the effect.
NOTE: Effect Smoothing ONLY works in increments of 5. For example, 5, 10, 25, 40, 60 are all valid Smoothing Effect settings. If you set a slider between an increment of 5, it will only use the lower value (ie. if you set the slider to 7, it will only register as a 5). Sim Racing Studio may update the slider in the future to represent these increments.
WARNING: Be careful when applying Smoothing Effects. Smoothing Effects will average out telemetry overtime to smooth it out. The higher the Smoothing slider setting, the farther back it averages out the telemetry to remove spikes. This can easily cause small telemetry changes such as road heave or surge from gear shifts to disappear completely. Effect Smoothing should only be utilized to fix issues with motion that are unable to be resolved via Max Telemetry or Effect Slider settings. In addition, a higher value in Smoothing Effects might require lowering the Max Telemetry (1 or 2 digits max) for that axis since telemetry spikes are reduced.
For example, there are some games that have telemetry spikes for specific axis either due to in-game functions or corrupted/bad telemetry. These could include Pit Speed Limiters in iRacing for specific vehicles in which Surge Smoothing would assist in calming down the motion when entering the pits, DCS sway spikes while on the ground or loading onto the catapult, or other games that have corrupted telemetry, such as Epic Roller Coasters, to smooth a specific axis. If there is a jarring/jerking motion that can't be mitigated by Max Telemetry or Effect Slider settings, smoothing a specific axis could potentially be utilized.
These Smoothing values will be applied after the Effect Slider and Max Telemetry settings before they are calculated for the final platform position. Here is an example of the workflow:
GAME TELEMETRY -> EFFECTS SLIDER + MAX TELEMETRY + ADVANCED AND SMOOTHING EFFECTS -> MAIN SRS FORMULA -> PLATFORM SETTINGS (MAX ANGLE, SMOOTHING, BOOST, REACTION SPEED, BOOST)
Advanced Settings
These settings allow specialized tuning for specific effects/axis as well different motion platforms. Some settings will only appear if the game or platform is supported.
Racing Sims

Flight Sims

· MIN TRACTION LOSS ACTIVATION – Is utilized to make Traction Loss more noticeable by only engaging when there are larger movement swings so it’s not lost in other movements from the platform. This will cause the platform to “snap” into Traction Loss so it’s more noticeable. For example, if Min Traction Loss Activation is set to 30, then the platform will not begin to move Traction Loss until the telemetry input has reached “30% of its range” then it will snap to the left or right to catch up making it easier to feel the traction loss. If less snap is wanted when Traction Loss begins, reduce Min Traction Loss Activation. If you want more snap, increase this value. Note: It is HIGHLY recommended to set Min Traction Loss Activation to 0 which will disable it to avoid jarring motion. This will allow all the traction loss motion to be available to the platform.
· ENHANCED G-FORCES – (Non-Actuator Only - Only available for DOF Reality H6/P6 platforms) If Enhanced G-Forces is turned OFF, the platform will move parallel to the ground during surge and sway restricted by the maximum movement range of the platform. With Enhanced G-Forces turn ON, the surge telemetry will be used to pitch the platform forward instead of surging forward, and the sway telemetry will be used to roll the platform instead of swaying side to side. This allows for a constant "g-force" being felt during long periods of acceleration/deceleration via pitch or sideways movement via roll. Important Note for H6/P6 tuning: Test with Enhanced G-Forces set ON and OFF to ensure the proper motion is being felt for the type of vehicle being utilized.
· ROLL (Angle/Rate) / PITCH (Angle/Rate) - For flight sims that are supported, there will be an additional option in Advanced to set either Roll or Pitch as Angle or Rate. If you select Angle, the platform will follow the Angle of the plane and maintain that angle regardless of the rate of angle change (ie, you pull up and climb at 45 degree, the platform will stay at 45 degrees the entire climb). If you select Rate, the platform will return to a level position once the rate of the angle change is complete (ie. you pull up and climb at a 45 degree angle, the platform will pitch up initially, but since you are no longer changing the rate of the climb, it will slowly move back to level). Again, tuning is essential as each game and plane have different rates of self-leveling that are sent to SRS. Some of them are smooth, some are more abrupt.
· GEAR SMOOTHING FACTOR - When a gear shift occurs, there is a momentary spike in decel surge telemetry which can cause the platform to surge/pitch back and forth extremely hard. Gear Smoothing Factor will apply a momentary amount of Surge smoothing during the gear shift to minimize the movement. The amount of Surge smoothing depends on how high the Gear Smoothing Factor slider is set. When the slider is at 0 there will be no smoothing, increasing it towards 100 will increase the amount of smoothing added during the gear shift.
Important Note: Increasing Gear Smoothing Factor above 50 can induce a potential latency in the return of the platform to its normal surge position. This is due to the large amount of surge smoothing that is still occurring after the gear shift has been completed. If a delay in surge is felt after shifting (normally felt when downshifting), lower the Gear Smoothing Factor.
In addition, if an extremely high Gear Smoothing Factor is utilized (at or near 100) and gear shifting is very quick (ie. F1 racing), the gear smoothing could potentially still be applied to the previous shifting event, making subsequent gear shift feel more abrupt or jarring as the Gear Smoothing Factor has not reset. Lower the Gear Smoothing Factor to resolve the issue. · MOTION REFRESH RATE - (Actuator Only - Only available on Prosimu platforms) This setting adjusts the number of instructions per second sent to the platform. For actuator based systems, such as Prosimu, the default is 1000. This should be adjusted if you feel lag in your movement from what is appearing on screen versus what you feel in the platform. Increasing the slider will use more of your CPU. If increased too much, this setting can begin to introduce latency which is dependent upon the power of your PC and the motion platform. Default settings are highly recommend and only should be adjusted if necessary.
Vertical Actuator Effects
(Actuator Only - Only available with dedicated horizontal actuators utilized for Surge, Sway or Traction Loss).

Vertical Actuator Effects enables the ability to add Pitch to Surge, and Roll to Sway or Traction Loss. This can be utilized to match the pitch of the vehicle as it accelerates/decelerates or roll during sway or traction loss. It can also be utilized to emulate sustained g-forces during these effects due to the limited horizontal travel of the actuators. The higher the value, the more pitch or roll will be factored into the overall effect performed by the vertical actuators which normally would not move from surge, sway, or traction loss telemetry.
Note: It possible for the horizontal movement of an actuator to be minimized by the roll or pitch movement from the Vertical Actuator Effect. This will apply to Sway, Surge, and Traction Loss. For example, when sway occurs when turning left, the bottom platform will move to the left (representing the car moving inward of the left turn) causing the sway feeling in the bottom of the seat as the vehicle moves out from underneath you. However, with Sway Vertical Actuator Effects turned up, the platform will roll to the right simulating the g-force. The issue is the bottom platform is moving to the left while the top platform is rolling to the right. These two motions at the same time tend to cancel each other out and the user no longer feels the sway of the bottom platform. Thus it is recommended to use very little Vertical Actuator Effects unless there is a lot of body roll in the vehicle due to loose suspension.
THANOS
(Actuator Only)
The Spike Filter settings is where you set the level of the spike parameter (distance between two positions on a scale from 0 to 65535) that determines when the motion the platform will be slowed due to a motion cue that would cause the platform to exceed a safe speed and result in a jarring level of motion. A default level for the Spike Filter for normal racing is approximately 1800; however, this lower number will likely engage often in high performance vehicles or on extreme tracks. A value of 2700 will enable most motion found in typical road racing; 3600 for rally racing.

The Spike Filter value represents a stroke travel. For example, if you use the recommended Spike Filter level of 1800, the total stroke for a 150mm actuator would be approximately 4mm of free travel for fast vibrations/motions. If there was a motion that instructed the actuator to go instantly to 5mm, the Spike Filter would activate and slow down the motion of the platform. The Spike Filter calculation is as follows: 150mm / 65535 = 0.0022888533 1800 * 0.0022888533 = 4.11993594 mm
The Spike Filter Vertical will apply the spike value set to the vertical actuators. The Spike Filter Horizontal (TL) will apply the spike value to the horizontal actuators (if available). Note: If the Spike Filter value for either Vertical or Horizontal is activated, BOTH the vertical and horizontal actuators will be slowed down until the telemetry is below the spike filter threshold.
The Spike Filter Veritcal and Spike Filter Horizontal (TL) values are saved to each specific motion profile in SRS; therefore, you can have a general Spike Filter setting for the sim as well as different Spike Filter settings for different vehicles.
Thanos Spike Filter Settings

Sim Racing Studio will override the value set in the Thanos controller for the Spike Filter range. Therefore, the Spike Filter value within the Thanos controller will only be utilized if 1) Sim Racing Studio is closed before the Thanos controller parks the platform or 2) if the PC that is running Sim Racing Studio crashes, is shut down accidentally, or suffers a power outage. A UPS (Uninterruptible Power Supply) could be utilized to power the Thanos controller and actuators in case of a power supply failure (See the Uninterruptible Power Supply (UPS) and Actuators guide here for more information).
Spike Filter Settings from Cloud Tune Shared Profiles
Sim Racing Studio Motion Profiles that are downloaded from the Cloud Tune Shared Profiles do not import the profile's Spike Filter settings. This is due to the different types of platforms available and potential risks with values that are too high. SRS will utilize a default Spike Filter setting of 1800 which, as indicated above, could result in the Spike Filter engaging often resulting is slow or sluggish motion for some high performance vehicles, rally racing, or flight sims. Utilize the recommended Spike Filters from the creator of the motion profile if it is posted in the Motion Profiles - Actuator forum here. Otherwise, adjust the Spike Filter settings based on your personal preferences and platform.
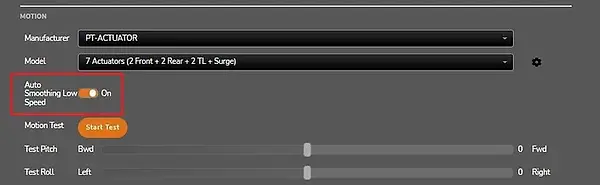
Auto Smoothing Low Speed
With Sim Racing Studio version 2.20.0.8 or higher, a new global feature was added that will greatly increase effect smoothing on ALL axes when a vehicle is under 6 kph. This will mitigate jarring motion during pit stops, hard braking or other events that occur at low speeds. To enable this feature in SRS, go to the SETUP > HARDWARE and under MOTION, click the button to turn ON Auto Smoothing Low Speed.
Important Note: This will apply to all vehicles and all games as it is a global setting. This could result in some vehicles or aircraft at a stand still or very low speeds not reacting quickly with changes in telemetry.
What is Telemetry
Telemetry are positive or negative numbers that originate from a game that provide data on the position and other metrics for a vehicle. Telemetry data includes Pitch, Roll, Yaw, Sway, Surge, Heave, Traction Loss along with other telemetry for Engine RPM, Suspension, Gear and Wheel Slip if available from the game.
For example, below is a single segment of the telemetry output for a Porsche 911 GT3 in Assetto Corsa:
This data represents 1/20th of a second of telemetry for the vehicle. The speed at which SRS exports the data is 20 times per second. The game and platform may have higher output settings; however, for tuning motion 20 times per second is enough. The numbers are rarely 0.0 and will sometimes have very small numbers even if there is nothing occurring on the axis.
There is only a single value for an axis. To determine which direction on the axis the movement is occurring, a positive or negative value is utilized:
-
Pitch - going up is usually a positive value, going down is a negative value.
-
Roll - rolling right is usually a positive value, rolling left is a negative value
-
Yaw - yawing to the right is usually a positive value, yawing to the left is a negative value
-
Sway - swaying to the right is usually a positive value, swaying to the left is a negative value
-
Surge - accelerating is usually a positive value, decelerating is a negative value
-
Heave - heaving upwards is usually a positive value, falling downwards is a negative value
-
Traction Loss - swinging to the right is usually a positive value, swinging to the left is a negative value.
These numbers will vary from game to game and vehicle to vehicle. Their values will depend on 1) the physics engine utilized by the game developer and 2) the performance output of the vehicle in that game. Since these values can change from game to game and vehicle to vehicle, motion software like Sim Racing Studio need to know how to handle the values which is done via the Max Telemetry setting.
Understanding the Effects Sliders and Max Telemetry
To adjust the motion profile for a vehicle in a game, you must first have a good understanding of exactly what the Effects slider actually does and how it relates to Max Telemetry. Telemetry data can be different from game to game and vehicle to vehicle, thus Sim Racing Studio uses a very complex formula that takes the telemetry output from a video game and converts it into an platform position. However, since every game and vehicle's telemetry can be different, Sim Racing Studio needs to know the potential range in values of the telemetry (ie. 0 to 20?, -24 to 14?, -180 to -180?, etc.) that will be available for a specific vehicle in a specific game for a specific axis. Without knowing the range of the telemetry for a vehicle, SRS doesn't know how much to move the platform when a telemetry value comes up. If the telemetry value is 8, does it move the platform halfway? Should is move its maximum potential movement? Should is move very little? The value that makes that determination is Max Telemetry.
- Max Telemetry tells SRS when to move the platform on a specific axis to its maximum amount of potential movement.
For example, if you set the Max Telemetry for Pitch to 10, and the game sends a telemetry value of 5 for pitch, then SRS knows it needs to move the platform to pitch to about 50% of its potential travel. Set the Max Telemetry for Heave to 8, and when the game sends a telemetry value of 2, it will heave up the platform about 25% of the potential travel. The key here to remember is Max Telemetry is ONLY telling SRS when to move to the maximum amount of potential movement.
- The Effect Slider tells SRS how much of that potential movement to utilize and how predominant it will be felt against the other axes.
Since we now have the Max Telemetry set correctly for the potential max telemetry output for that specific axis in the game, we need a way to tune how much of that potential motion is actually utilized. The Effect Sliders is how you adjust the overall motion.
For example, if for Surge you have the Effect Slider maxed out at 20 and have the Max Telemetry at 15, when the game outputs a telemetry value of 15, SRS will attempt to move the platform as much as possible with the available amount of potential movement. If you reduce the Effect Slider down to 10, keep the Max Telemetry at 15, when the game outputs a telemetry value of 15, SRS will now only attempt to move the platform about 50% of its potential movement.
- Max Telemetry tells SRS when to move the platform to its maximum movement, the Effect Slider allows you to tune that motion against all the other axes.
IMPORTANT: It is not this simple as SRS calculates ALL the axes together to determine the best potential motion. It will avoid potential motions that conflict with each other as well such as when braking hard (pitching forward) while climbing (pitching backwards) a steep hill. There are many different factors, but the above examples are good generalizations to understand the basic principle.
Max Telemetries, though based heavily on the actual telemetry from the game, can also be adjusted to impact motion (ie. Lowering the Max Telemetry will INCREASE the speed at which the platform moves to the maximum amount of potential movement. For example, if Surge Max Telemetry should normally be at 10, but you lower it down to 5, it will reach its maximum amount of movement for surge in half the time). See the Adjusting Max Telemetry section below for more information.
Capturing Telemetry
The closer Max Telemetry is to the actual maximum telemetry an effect might output during optimal driving or flying, then the closer the platform will be to replicating the actual movement. Capturing telemetry is the first step to create a motion profile for a new vehicle or a game. Sim Racing Studio has 3 methods to obtain telemetry: Capture, Export, and Intellitune Wizard.
Capture - After you have loaded into a vehicle in a game, in SRS, go to GAMES > Telemetry and click the button next to Capture. This will display the active telemetry at the moment. You can view the telemetry in real-time if needed. Note: Though the Min/Max values are the overall min/maximum values for the entire session, it could contain corrupted telemetry (crashes, telemetry bugs, loading the vehicle in to the game, etc) and might not accurately reflect the appropriate Max Telemetries for that vehicle.
Export - This is the primary and most accurate way to export telemetry. It will capture telemetry output up to 20 times per second that can be then evaluated over a long period of time to identify the correct Max Telemetries and exclude bugs, erroneous data, and poor driving/crashes. Intellitune Wizard - The Intellitune feature can also be utilized to estimate Max Telemetry values. However, since it’s limited to 3 minutes, unable to be reviewed for errors, and greatly dependent upon the singular performance during the capture session, it should only be utilized as a base line or when advanced tuning isn’t desired. For more information on the Intellitune Wizard since it won't be covered in this guide, please contact Sim Racing Studio or view their guide here.
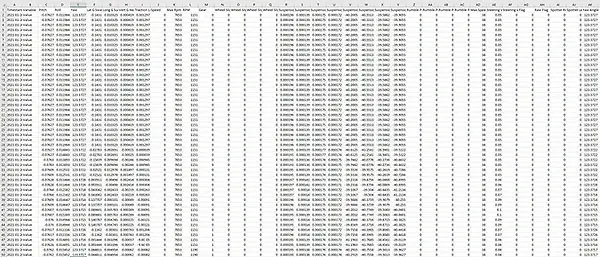
Exporting Telemetry
Sim Racing Studio has the ability to export telemetry into a .CSV file which will include the telemetry output 20 times per second. With exporting telemetry, its possible to have 24,000 points or more of telemetry data (5 min sessions across 4 tracks - 20 minutes total of captured telemetry) that can now be easily put into a spreadsheet and graphed in charts to spot corrupted telemetry. This process provides the best results in obtaining accurate Max Telemetries. Below is a process developed to analyze the telemetry data. It its focused on the idea of an Evaluated Max Telemetry. The Evaluated Max Telemetry is simply the value that the Tuner has decided upon when reviewing the telemetry data for a specific axis. The Tuner could exclude spikes and/or see patterns in the data that indicate what the average standard Max Telemetry value for a specific axis. This should be repeated multiple times over different tracks to ensure the vehicle performance is accurately identified. Once the Tuner identifies this value, it can be considered the Evaluated Max Telemetry value. This value should likely be averaged among all the sessions for different tracks, compared against the raw telemetry data as a reference, and then finally tested as a Max Telemetry setting for that axis.
To use this feature.
1) In SRS go to SETUP > Telemetry
2) Select the Export button to turn it ON
3) Telemetry is now being captured at 20 times per second in a .CSV file. 4) The file will be located in Documents > SimRacingStudio 2.0 in the export folder. The file will have the game name and date/time stamp for ease of identification for multiple sessions of collecting telemetry.
5) This file can be opened in Excel as a .CSV file and put into a chart to review the data over time for each axis. Example of the .CSV telemetry data output:
This data can then be put into a chart to evaluate if there are any spikes or corrupted data. Here is an example graph in Excel of only the sway telemetry for the 2019 McLaren 720S GT3 in Assetto Corsa Competitione for 5 minutes of data (6,000 telemetry data points):

The Tuner would then review this data and adjust the Max Telemetry for Sway as needed. Multiple sessions of the same car on different tracks should be utilized to verify if sway is consistent and accurate on all tracks. Here is the same 2019 McLaren 720S GT3 in Assetto Corsa Competitione data, but with 3 more tracks:
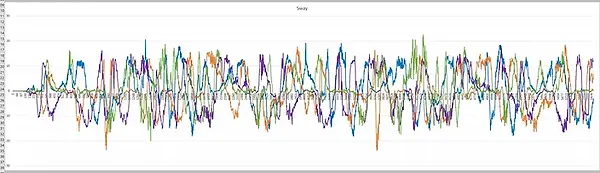
As you can see, there are a couple telemetry sway spikes in orange that if utilized might results in a sway max telemetry setting that is too high. All the data must be reviewed and then an evaluated Max Telemetry can be set which is a good average of the high telemetry value for sway. In this case, it might be 18 or 19. You can then create a dashboard of charts and information that is gathered from the telemetry over time session to make evaluation easier.
-
Shows raw telemetry data as a reference point. This will provide the Min/Max values purely for informational purposes to make decisions.
-
Provides a chart/graph for each axis for individual evaluation (pitch, roll, yaw, sway, surge, heave, and traction loss)
-
This is a key element. Each telemetry session should be reviewed manually to identify the actual max telemetry value that is not impacted by spikes.
-
Provide a method to document an evaluated telemetry for a specific axis for each specific track so it can be averaged out with 3 other sessions to provide the most accurate evaluated max telemetry possible. Often, this evaluated max telemetry value will be a point or two lower than the raw telemetry Min/Max absolute values.
-
If Smoothing Effects are being utilized, they will low the spikes in telemetry as its averaging the data over time. The higher the Smoothing Effect settings, the lower the telemetry spikes will be for that axis. This could impact the overall Max Telemetry setting since its being averaged to a lower value. Decreasing the Max Telemetry value slightly depending on how much Smoothing Effects are utilized will ensure maximum travel on that axis is still possible.
-
Once all the Evaluated Max Telemetries are averaged, compared against raw telemetry data to ensure there are no sweeping inaccuracies, and confidence is high by the tuner the sessions provided accurate telemetry, then the final results should be utilized as the Max Telemetry settings for the motion profile.
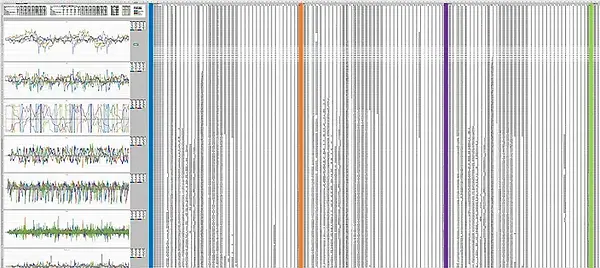
Example image of the dashboard utilized for Pro Tunes:
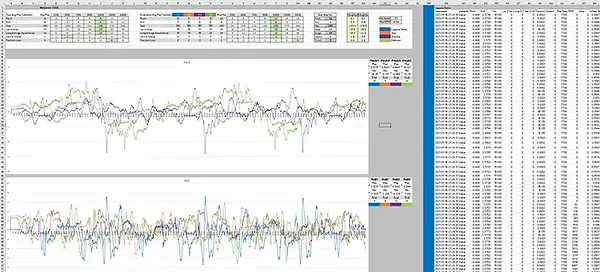
Zoomed out view:
Advanced Telemetry Gathering
Here are some ideas to think about when capturing telemetry for different types of vehicles.
Aircraft/Spacecraft: When capturing telemetry for an aircraft or spacecraft, a few things should be taken into consideration:
-
The telemetry captured while on the ground will likely be different than in flight. Be cautious of ground maneuvers causing spikes in telemetry (usually heave or surge) and corrupting telemetry for flight.
-
Landings will generally cause large spikes in surge and heave. This will corrupt flight telemetry as well.
-
Depending on the aircraft, be mindful of how you are flying. If a commercial aircraft, slow smooth movements will result in low telemetry which is good for small felt changes in the platform. Hard sweeping movement like in a jet fighter will result in large telemetry outputs and allow for large motion without jarring movements.
-
Special events like catapult launches or in space sims boost or exiting the frameshift drive in Elite Dangerous can cause large spikes in telemetry.
-
Utilizing any boost, afterburner, or cannon fire effects will likely cause spikes in surge.
-
Utilize any breaks, loops, rolls, hard yaw or rudder movements or similar actions the aircraft/spacecraft are capable of that would occur during normal flight
Review the telemetry to look for spikes or outliers in telemetry. Telemetry from Takeoff and Landing can be excluded or tuned as needed since they might have outliers in high values. Aircraft and Spacecraft are generally thought of to have a smooth movements. Sometimes smaller movements are more immersive. Higher Max Telemetry values will avoid harsh movements, but might loose the fidelity with smaller changes in elevation or direction.
Ground Vehicles: When capturing telemetry form a vehicle, take the following items into consideration:
-
Starting telemetry from the pits could potentially cause corruption depending on if there are any startup/surge spikes or similar telemetry bumps until you get on the race track.
-
Drive at least 2 or 3 good laps, which depending on the track can be near 5 minutes.
-
Avoid going too slow, the driving should be performed at a normal race pace.
-
Avoid collisions with other vehicles or objects.
-
Avoid skidding off the track and minimize out of control skids on the track. Some traction loss is acceptable and expected in normal racing conditions. Do capture one separate session with a skid in order to adjust Traction Loss.
-
Ensure braking would be perform as a normal race.
-
Driving over a chicane or curb will spike heave, which is fine, but avoid excessive bumps and launches off curbs at high speeds as they will greatly spike heave.
-
Traction loss should be minimized so you capture the true race performance of the vehicle; however, if its a rally/drift car, drift as needed to capture the correct Traction Loss telemetry.
-
Trading paint/bumping with another vehicle or crashing will spike telemetry values (sway, surge, heave, etc), avoid at all costs.
Telemetry from a pit stop can be skewed if its captures the vehicle being raised on jacks for tire changes or other events. Extreme slides or collisions will spike Long G Surge Accel or Decel as well as Heave.
Find the right balance of telemetry for each effect is key in order to have the fidelity while driving to help make decisions on braking, turning and accelerating while racing.
Track Variation: When collecting telemetry for a vehicle tuning, always gather telemetry from multiple tracks. A good starting point is 3 to 4 different tracks at a minimum. This will allow you to have a wide range of surfaces for improved Heave telemetry as well as elevation and road geometry changes for Pitch and Roll. In addition, the speed for certain corners will impact Sway and potentially Traction Loss. This variation will allow an improved average telemetry to improve performance on many different tracks.
Sample Length: Capturing near 5 minutes of telemetry over time should be obtained to ensure an accurate capture of telemetry occurred. This will allow you to identify outliers and potentially exclude them from your samples. 5 minutes of capture time should allow for 2 laps on large tracks and 3 to 4 laps on smaller tracks.
Jumps and Landings for Rallycross, Dirt Rally, and Aircraft: When capturing telemetry from any type of vehicle that experiences a jump and hard landing, be aware this will corrupt the Surge and Heave telemetry. When the impact occurs, it will cause a spike in Surge and Heave as the vehicle lands and experiences high g-forces in these effects. This higher telemetry value is so extreme it will cause standard driving or flying effects to be minimized if the are utilized for calculating Max Telemetry. These telemetry spikes should not be included when creating the Evaluated Max Telemetry.
When tuning for Dirt Rally or Rallycross races that have jumps, it's recommended to be very cautious of including these spikes into the Evaluated Max Telemetry. When a jump does occur after tuning is completed, the spike in telemetry will reach the Max Telemetry value extremely fast and provide the expected experiencing of hitting the ramp and/or landing.
Landing in an aircraft is similar in that landing Heave or Surge spikes should not be calculated into the final Max Telemetry values.
Resetting Telemetry
When you are Exporting telemetry and an event occurs that can cause corruption (hitting a wall/car, sliding off the track, going into a stall, etc) or you want to start a new file for data collection, you can reset the telemetry and start a new exported .CSV file with a new time stamp by toggling the Capture or Export buttons On and Off. To assist in resetting telemetry on the Telemetry page, you can bind a keyboard key press or joystick button to turn On/Off Capture Telemetry, On/Off Export Telemetry, and to Reset Telemetry.
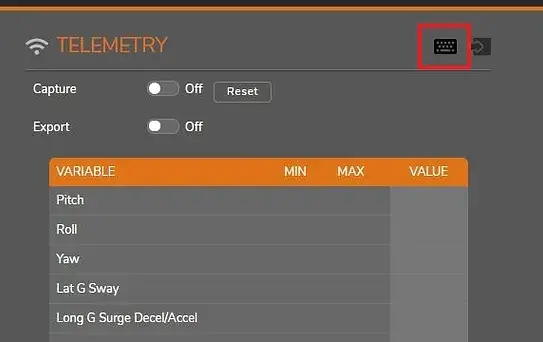
To bind a keyboard key press or joystick button, click the keyboard icon in the upper right of the Telemetry page.
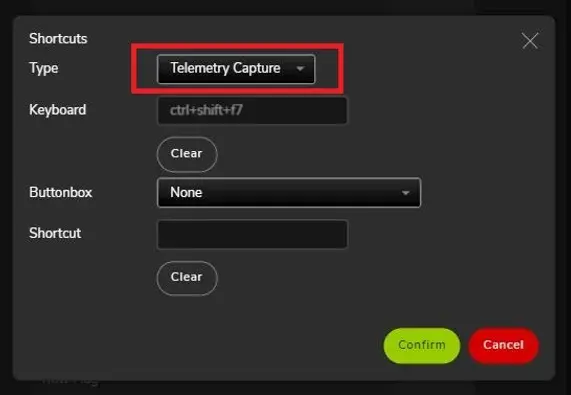
In the new window, you can set a Keyboard key press or Joystick/Buttonbox press to enable Telemetry Capture or Telemetry Export On or Off. You can also change the Type field by selecting it and choosing Telemetry Reset.

Now you can easily bind keyboard key press or a button on your Buttonbox, Joystick, or Steering Wheel to quickly reset telemetry in Sim Racing Studio while you are tuning. Note: The joystick or buttonbox will only appear if it has been detected by Windows. Once you have selected the correct joystick or button box, press the button you want to bind and then click the Confirm button.
Corrupted and Bad Telemetry
Since there are no industry standards like DirectX for telemetry output, the values captured can sometimes be corrupted by impacts, unknown variables, contain telemetry data not associated with normal movement, extremely low values, or is just buggy in terms of the telemetry values available.
Game World Impacts: A vehicle impacting something in a sim will usually create a large spike within a telemetry value as it replicates the g-forces of the crash. These are usually seen as extremely large spikes in Heave, Sway, or Surge; however, accidents can also impact Pitch, Roll, and Sway as the orientation of the vehicle spins/flips around. When accidents occur, the telemetry will contain these higher values which is seen with the extreme movements of the platform.
Excluding impacts from captured telemetry is essential to ensure the tuning represents normal driving. If the Max Telemetry setting contains these spikes from accidents, normal movement will be minimized or barely felt as the g-forces during normal driving or flight are significantly lower than that of an impact. This is why obtaining "clean" telemetry will provide the best motion platform experience.
Corrupted Telemetry: An example would be when a sim first loads a vehicle onto a track or runway via "dropping" it into the game world. This placement of the vehicle can cause a large spike in Heave, Sway, or some other effect and thus corrupt the Min/Max values for telemetry. This is normally felt in the motion platform as extreme movements when first loading into the game.
It's important to monitor the Captured Telemetry immediately after loading the vehicle. If large spikes in telemetry are seen, you can reset the telemetry by clicking the Capture or Export button Off/On prior to recording telemetry data. Corrupted Telemetry values should always be excluded from the data while tuning Max Telemetry by collecting it clean or manually removing it when reviewing the data.
Unknown Variables: Since there are no industry standard for telemetry output, how telemetry is gathered from the vehicle in game can vary widely from sim to sim. There should be general principles applied, but sometimes there will be values that have no direct relationship to the activity of the vehicle. The values are usually seen impacting other effects that shouldn't be impacted or there isn't a specific logical reason for their impact. For example, when accelerating forward in a vehicle, traction loss telemetry increases at the same rate as speed even though the vehicle isn't losing traction.
Unknown Variables seen in telemetry values should be normalized or excluded from the data while adjusting a Max Telemetry.
Buggy Telemetry: This will be seen as values that are extremely high (usually over 180), values when there is no movement on the axis, or no telemetry values reported when movement should occur. Buggy telemetry is common for sims that utilize Memory Hooks due to developers not supporting telemetry outputs or seen in games that are not sim orientated, such as roller coasters or other arcade like games that don't focus on realistic physics.
Tuning the telemetry output for these types of games will require the tuner to become creative with the data. Setting Max Telemetries that taken into account the motion platforms abilities will be a primary focus versus using the range of telemetry values captured from the game.
There is no easy fix for these games as the telemetry output can not usually be adjusted for within SimRacingStudio. The tuner must work with what is available.
Extremely Low Telemetry Outputs: Some sims will have telemetry outputs so low they never go above a value of 1. They will be seen as 0.0129 or 0.68. This could be there is no actual g-force or effect for the vehicle, thus making the number accurate; however, if a vehicle would normally feel a g-force; then the output isn't providing the accurate telemetry.
Lowering Max Telemetry to 1 might enable some movement, but it could be jarring and will likely not have the fidelity possible for the effect. If lowering Max Telemetry is still unable to obtain sufficient movement, submitting a ticket to SimRacingStudio will be needed in order for the telemetry value to be multiplied so a tuning range within Max Telemetry can be utilized. Motion is still possible; however, the fidelity and lack of priority in terms of overall movement will be impacted negatively by extremely low values.
Special note on Pitch, Roll, and Yaw: These values will change from sim to sim, but generally it represents the orientation of the vehicle in 360 degrees in space. This will be seen as Min -180 and Max +180. However, these values could also not use spacial orientation and be some factor of g-forces and positional data. Monitoring these values closely are important for a tuning that feels "correct". Expectations of movement are usually centered around the 3 axis.
For motion platforms that are unable to rotate 360°, the movement can be extremely violent as the platform switches from -180 Yaw to +180 . This is a key reason why the Effects slider for Yaw is set to 0 with Max Telemetry at 1800 to remove Yaw movement on these platforms.
Adjusting Max Telemetry
Why would you want to adjust a Max Telemetry value?
The primary focus of a motion platform is to move. If the Max Telemetry is set too high for an axis, the vehicle in the game will never output a telemetry value close to its maximum value. This will cause the platform to have very little movement on that axis. If the Max Telemetry is set too low, then the vehicle's telemetry will easily pass the Max Telemetry value often thus leading to extremely jarring and unrealistic movements. The key is finding the right Max Telemetry to allow for the full range of normal movement of the vehicle under normal circumstances (See Advanced Telemetry Gathering).
Here are some general considerations when adjusting a Max Telemetry:
-
There will be instances where the Max Telemetry is just extremely low based on captured telemetry. If a Max Telemetry is 3, you must be careful in reducing it further to 2 or 1 as motion will potentially be extremely fast and jarring.
-
When lowering a Max Telemetry, you are allowing for more movement of the platform with less input from the driver/pilot since the smaller telemetry values from the game will hit the max telemetry value sooner). This will provide addition fidelity of movement for small changes in altitude in a plane or small adjustments while driving down a straight road. The compromise will be when a large movement is executed (pulling straight up in an aircraft or making a sharp turn), the motion will be extremely fast and jarring.
-
Increasing Max Telemetry could be utilized to reduce the overall motion for a specific axis after you have reduced the Effect Slider down to 1. Since reducing the Effect Slider to 0 will effectively turn off that specific axis effect, increasing the Max Telemetry will provide additional headroom for the Effect Slider. As you increase the Max Telemetry value, return the Effect slider back to 10 to being adjusting from a neutral position. For example, if you have the Max Telemetry for Traction Loss set to 3, but the motion for Traction Loss feels very jarring after reducing the Effect Slider all the way down to 1, you can increase the Max Telemetry to 4 or even 5 which will allow you to increase the Effect Slider for Traction Loss back up to 5 or 10 to help balance it against all the other Effects.
-
Remember, the Max Telemetry sets the maximum potential movement range for the platform. If you raise Max Telemetry too high and the game never outputs a telemetry value that meets or exceeds your Max Telemetry setting, you will never reach the maximum movement possible for your platform for that specific axis.
General Max Telemetry Tips
Pitch - Max Telemetry
Pitch telemetry output represents the angular position (angle in radians (degrees, revolutions)) of the vehicle in the game world relative to a flat plane.
For example, if the vehicle is going down a 7 degree hill, usually the captured telemetry MIN value will be –7.0. If it’s going up a 14.2° hill, the captured telemetry output MAX value will be 14.2. The same applies for flight sims. If the aircraft is climbing at a 45 degree angle, the Pitch telemetry will show MAX 45.0. If it’s diving straight down, it will be MIN -90°.
For flight sims, if the aircraft does a complete loop, the captured telemetry will output –180 min and +180 max as it completed a full 360° loop (starts at 0, climbs to 45, then straight up is 90, inverting at 135, upside down at 180, then -180 as its inverted level, -135 as its pitching down, -90 flying straight down, -45 as it pulls up, back to 0 of level flight).
The important part to remember about setting a Max Telemetry for pitch is 1) the overall angular pitch movement available for the platform and 2) how much of the pitch travel is wanted in the platform.
For racing sims, if you set Pitch to exactly what is captured in telemetry output, but you only drive a relatively flat track like Sebring, the max telemetry you capture will likely only be 2. If you set Max Telemetry to 2, then the platform will quickly rise on other tracks like Laguna Seca that can have a telemetry output for pitch up to 13. The platform will reach its maximum pitch quickly as you go up a hill which could result in jarring motion. It's recommended to find a balance or middle-ground for the the types of tracks that will be raced. For road course racing, this is around 7, but it can vary depend on the tracks and type of racing (Dirt Road can have jumps with large spikes in Pitch). A balance is needed to be utilized so you can still feel surge effects while pitching up in the platform when climbing a hill or ramp.
For flight sims, if you do a complete loop, the captured absolute maximum telemetry value for pitch will be 180. If you set your Pitch Max Telemetry to 180, the only time your platform would pitch to its maximum amount of movement in pitch would be at the end of a loop. If you set Max Telemetry to 90 (flying straight up at a 90° angle), then the platform would only reach maximum pitch when you flight straight up. The negative is you would feel very little platform movement during normal flight if Max Telemetry is set at 90 since the platform is likely only receiving pitch telemetry changes between 5 to 10° degrees during normal flying maneuvers.
It's recommended to lower the Pitch Max Telemetry to have the user feel the platform pitch back to its maximum motion when it reaches 25 to 45 (dependent upon the performance of the aircraft). This will allow to platform to move backwards as the aircraft climbs, providing the g-force effect feeling, but will stop moving when in-game telemetry hits 45. These values should be experimented with based on the aircraft being utilized.
Note: Its possible that single-digit Max Telemetries could be utilized for Pitch to provide fidelity in motion for very small changes in flight. However, it will cause jarring motion if large motions are made. A balance based on the intended flying use should be utilized (ie. lower max telemetries if casual/civilian flight is desired, increase max telemetries if jet fighter/aerobatic flight is desired.)
Roll - Max Telemetry
Roll is exactly the same as Pitch in regards to angular position. The same concepts apply.
For most racing sims, Roll will be seen when hitting curbs, crashing, driving on a hillside or racing Oval tracks with high bank corners. Balance must be achieved as well similar to pitch in road courses, but increasing Roll for Oval racing does add more immersion as you can feel the banked corners.
For flight sims, the same concept as Pitch applies to Roll. Its recommended to lower the Roll Max Telemetry to have the user feel the platform roll side to side to its maximum motion when it reaches 25 to 45 (dependent upon the performance of the aircraft). This will allow to platform to move realistically as the aircraft rolls, providing the g-force effect feeling, but will stop moving at say 45° which will maintain the g-force feeling for the remainder of the roll. This is very dependent on the performance of the aircraft, as high performing aircraft like aerobatic or fighters can quickly complete a roll in under second, so increasing Max Telemetry to 50, 60 or above will help to mitigate the extremely jarring motion that can be encountered.
Note: The same single digit Max Telemetries for flight might be warranted depending on flying style. Refer to the note in Pitch for more details.
Yaw - Max Telemetry
Yaw is usually only exclusive to flight or space sims. Racing sims will utilize Traction Loss. For non-racing/flight sims, it will be a case-by-case basis. Yaw is completely dependent upon the telemetry output of the game as it can be one of two things: 1) the angular deflection from the center axis of the vehicle or 2) the angular direction the vehicle is pointing in the game world.
For most sims, it will be the angular deflection from the center axis of the vehicle. This will represent how far off axis the vehicle is when using rudder pedals. For most platforms, the movement on the Yaw axis can be jarring if done quickly, so setting the Max Telemetry to closer the actual captured telemetry value is recommended, but as always, it should be adjusted and tuned by the tuner. Helicopter simulators are notoriously harsh with Yaw telemetry.
If the Yaw value is the angular direction of the vehicle pointing in the game world, unless you have a 360°capable motion platform like YawVR, its recommended to disable Yaw telemetry. You can do this by setting the Effect Slider to 0 and the Max Telemetry to 1800 which will negate any Yaw telemetry outputs from impacting other effects in terms of predominance. The reason you disable on non-360° platforms is as the telemetry value approaches 180, it will flip to -180 immediately causing the platform to move extremely quick from full right yaw position to the full left yaw position.
Yaw Angle is available for YawVR, but won’t be covered in this guide at this time. Please see the YawVR forums for more information: https://forum.yawvr.com/discussion/29/faq#latest
Sway - Max Telemetry
Sway emulates the g-forces felt when cornering pushing the vehicle to the outside.
The captured telemetry for Sway is GREATLY impacted by the performance of the driver and how well they can push the vehicle to its maximum capabilities when collecting telemetry. Be cautious of corrupted Sway spikes by hitting walls or other objects and even during high speed skids when nothing is hit.
For racing sims, Sway tends to spike quickly and can lead to jarring motion. It might be needed to reduce the Sway Max Telemetry slightly to compensate for the required amount of smoothing effects. Sway can be easily tuned by feeling the platform movement when warming up tires and swerving back and forth on the track. Fast sharp corners will also produce spikes in sway for testing.
For flight sims, Sway can vary greatly in captured telemetry as its very dependent upon the flight model and if winds are reflected in telemetry (which usually are not included). It must be balanced against Pitch, Roll, and Yaw which are the expected g-forces felt while flying.
There are some flight sims, like DCS, that will spike Sway while on the ground or have other effects that impact the Sway output (loading onto a aircraft carrier catapult). Caution should be utilized when adjusting the Sway Max Telemetry to ensure a natural motion is felt during flight and not subjected to corrupted telemetry.
Surge - Max Telemetry
Telemetry for Surge will match the acceleration and deceleration capabilities of the vehicle.
For racing titles, the surge for deceleration will usually be higher than the surge for acceleration. This is primarily due to vehicle being able to stop faster than they can accelerate; however, this greatly depends on the performance of the vehicle (ie. Drag cars have a higher surge for acceleration).
Remember, Surge telemetry can be impacted very easily by hard braking to a complete stop (which isn’t normally done during a race). Also, any impact that will spike surge telemetry. Note: If you are stopping a vehicle while collecting telemetry to record the telemetry output, be sure to stop smoothly to avoid spiking telemetry values.
For flight sims, Surge telemetry can be seen during takeoff and landing. Rarely is an aircraft able to provide a g-force surge that is show in Surge telemetry (space sims excluded). The same principles apply when collecting data. Flight sims also tend to “drop” the vehicle into the game world when first loading, so be sure to capture telemetry after loading, clear it, capture during takeoff, clear it, during normal flight, clear it, and finally after landing. It’s important to have a good sense of accurate Surge telemetry for aircraft as the landing will spike many different effects.
IMPORTANT: Collisions are spikes in telemetry (hitting a car, landing hard, hitting a wall) and should not be baked into Max Telemetry. The platform will simulate the impacts more than enough by how quickly it will reach these spikes and bypass a normalized Max Telemetry setting. This applies to ALL axis.
Heave - Max Telemetry
For racing sims, Heave generally will be the primary source of road bumps. It is dependent upon the accuracy of the race track model. Laser scanned tracks should provide the best telemetry.
Balancing Heave is critically important to make the platform “feel” the road. A lower Max Telemetry ensures there is enough motion felt in the bumps, but this is completely dependent upon the motion platform, the vehicle being tuned, and the accuracy of track. Increasing the Effect Slider would be the first step in tuning, but once 20 is reached, begin to lower Heave Max Telemetry 1 point at a time until the desired road effect is felt.
Heave will also be represented in landing off jumps for Rally or Dirt Racing, so ensure the spike in telemetry are not matched precisely so the jarring landings can still be felt. If you match telemetry 100%, the landings will feel too smooth. Heave for racing sims is extremely critical to provide an immersive experience. When reviewing telemetry, look for values that are providing road feel vs the spikes for curbs or chicane bumps. Generally lower is better, but caution should be utilized to avoid making the platform too shaky.
For flight sims, Heave can provide that sense of weightlessness; however, its completely dependent upon the accuracy of the flight model. Rarely is turbulence modeled into telemetry, but it can be monitored during turbulence to see if a value can be obtained.
Generally, Heave for flight sims is seen during landing where a large spike will occur when hitting the run way. If captured telemetry is utilized too closely to this landing spike, the “hit” of the landing might not be felt, so its recommended to stay lower than what is captured.
Traction Loss - Max Telemetry
Used primarily for racing, Traction Loss Max Telemetry settings can be tricky to balance the feeling of losing traction while still feeling realistic when exiting a corner. Each sim will treat traction loss slightly differently.
Traction Loss is unique among all the other axis effects since it represents an "error" while driving (Rally, Dirt Oval and Road, or Drifting are exceptions and discussed below). If you capture telemetry and make no errors or abnormal motions while driving, the captured telemetry for Traction Loss will be relatively low, typically around 3. This is because you did not actually lose traction from over-steer or under-steer while capturing telemetry. There might be some very small values when entering or exiting a corner or while swerving on the track from tire slippage, but the values won't be high as if you did actually lose traction.
The issue with utilizing this lower value (~3), is just as when you captured with no errors, the Traction Loss telemetry value of 3 will occur. The platform will now move to its maximum possible traction loss movement often since the Max Telemetry value is so low resulting in potentially jarring motion. So, even if there is no over-steer or under-steer, you will likely feel traction loss occurring all the time because the Max Telemetry value is so low.
However, when capturing telemetry you do over-steer or under-steer, the value could be much higher, typically around 10 to 12. If you use a Traction Loss Max Telemetry of 12, the platform will barely move as the vehicle begins to lose traction and the platform won't reach its maximum amount of traction loss movement until the full skid has occurred. This results in an issue similar to adjusting the pitch and roll for flight sims. The car is rotating on the Yaw axis more than the motion platform can twist on the Traction Loss axis. There is an adjustment that can be made to "compress" the telemetry so you feel the beginning of the traction loss event in motion yet keep it from being to jarring in motion. Finding the balance between the traction loss telemetry value when driving clean and the traction loss telemetry value when skidding will provide a baseline max telemetry than could then be balanced with the Effect slider.
For example, in a clean run with no serious traction loss skidding in iRacing, depending on the vehicle, the captured telemetry for Traction Loss could peak at 3 or 4. If you utilize a Traction Loss Max Telemetry of 3, Traction Loss would often move to its maximum potential movement during normal driving and likely result in jarring motion. However, if you did actually over-steer and skid out of control, the capture telemetry for Traction Loss could peak to 10 or 12. If you utilized a Traction Loss Max Telemetry of 12, the platform would barely move at the beginning of a Traction Loss event which would feel less immersive and make catching the over-steer difficult.
Adding an additional buffer by increasing the Max Telemetry for Traction Loss to 5 or 6 (approximately 25% over captured Max Telemetry) from a good run will allow for a mix between the two values so that the Traction Loss event can be felt during the initial slide and the movement remains immersive throughout the entire event by not feeling jarring or dull. This is why it it critical to know how much the vehicle actually lost traction during the capture session (recovered slide vs full 360 degree spin) Some racing like Rally, Dirt Oval and Road, or Drifting are exception to this guidance as Traction Loss is not a driver error and intended for these type of racing. Utilizing the actual absolute values might be recommended since the platform will move more often on its Traction Loss axis. Depending on the driver's skill, a smaller Traction Loss max telemetry would allow for a more responsive feel in the traction loss of the vehicle specifically for drifting, however, it will result in more jarring motion if an extreme traction loss event occurs such as a crash.
Remember, when capturing telemetry, it’s a good practice to have a lap that is clean as possible to monitor how much Traction Loss telemetry occurs when exiting a corner. Perform another lap while pushing performance to have the vehicle lose traction slightly and catch it, much like a normal race, and analyze the data. Finally, perform a lap with a complete skid out to see what the maximum Traction Loss would spike too. This will give you a baseline of min to max for Traction Loss. However, it’s very important NOT to use the large spike from the skid out since it will make feeling the traction loss event difficult to feel as it begins for regular road racing. A balance between the clean run and the caught traction loss event is best.
General Effect Slider Tips
Note: The recommended values below are based on a PT Actuator 6DOF Simracing Platform (150mm: 7 Actuators (2 Front + 2 Rear + 2 TL + Surge). For platforms that do not have horizontal actuators, see '4 Vertical Actuators vs Additional Horizontal Actuators' in the Platform Differences section blow for more information on adjustments.
Turning Off an Axis
If a specific axis is not needed, such as Yaw in racing sims, it can be disabled by turning the axis switch to OFF. You can also disable an axis by setting the Effect Slider to 0 and setting the Max Telemetry to 1800.
Pitch - Effect Slider
The Pitch Effect Slider has the greatest impact on feeling elevation changes in racing such as climbing a hill or the initial impact of a ramp as you go up a jump. Anything that will lift or lower the front end of the vehicle will be represented in Pitch.
-
For road racing, the amount of pitch should be determined by how much elevation changes, road dips and climbs, and other track variations are desired to be felt. Small dips in the racetrack are usually felt more in pitch than in heave. A mid to high range will allow for all track telemetry to be felt.
-
For rally or off road racing, a mid-to-high setting for the Pitch Effect slider will increase the feeling of ramped jumps or road launches as the vehicle pitches up quickly on the ramp/road.
-
For flight sims, its recommended to increase the Pitch value very high to obtain the most amount of pitch available in the platform during flight. However, lower amounts might be desired for civilian flight sims.
Roll - Effect Slider
The Roll Effect Slider has the greatest impact on feeling curb hits and banked corners in racing. Anything that will roll the platform from the left to the right will be represented in Roll.
-
For road racing, the amount of pitch should be determined by how much of the curb should be felt. In addition, banked corners will be represented in Roll for the vehicle which are particularly high in tracks like Daytona. Large curbs will also cause the platform to roll in addition to driving on the side of a hill. Mid-to-lower values tend to work well in most road racing games for Roll due to the jerky/violent impacts some curbs can reflect in Roll.
-
For rally or off road racing, a higher setting for the Roll Effect slider will increase the feeling of corner dips, sliding down hillsides, or any other effect that rolls the body of the vehicle including loose/long-travel suspension. A higher roll value is recommended.
-
For flight sims, its recommended to increase the Roll value very high to obtain the most amount of roll available in the platform during flight. However, lower amounts might be desired for civilian flight sims.
Yaw - Effect Slider
The Yaw Effect Slider will primarily be used for flight sims. Any twisting movement on the platform will be controlled by Yaw. This includes motion with platforms with just Traction Loss since Traction Loss is part of the Yaw axis and will move when the rudder is used in an aircraft. Sway telemetry is often swift and spiky and not a sustained sway g-force that might be expected.
-
For flight sims, Yaw twisting motion can be extreme. A mid to lower ranged value will minimize jarring side-to-side motion when using the Yaw axis.
-
For racing sims, if the platform is able to spin 360 degrees like YawVR, then the Yaw Effect Slider can be utilized to represent changes in compass heading while driving.
Lat G Sway - Effect Slider
The Sway Effect Slider will control how much the platform moves left to right in hard cornering or when swaying back and forth on the track to warm up tires. If you don't have sway actuators, it will be how much the platform rolls during sway. Any motion that will cause the vehicle to move laterally from side to sway is a result of Sway.
-
For racing sims, Sway telemetry is quick and spikes fast when entering a high g corner or when swerving quickly from side to side on the track. Finding a balance of Sway Smoothing Effects and the correct setting for the Lat G Sway Effect Slider will reduce jarring motion when entering and exiting high sway corners as well as quick side-to-side motions on the track. A mid-to-high setting generally works best for most racing vehicles; however, matching the amount of the Lat G Sway Effect Slider to the performance of the vehicle generally provides the best results (ie. high performance vehicle can product higher sway g-forces in corner, thus increase the Lat G Sway Effect Slider as well).
-
For flight sims, Sway isn't as often felt due to the nature of aircraft and banked turning. However, if a lower Sway Max Telemetry is utilized, Sway telemetry can still be felt and should be balanced against Pitch and Roll. Having the Sway Effect Slider in a neutral position will ensure Pitch and Roll are not impacted by Sway telemetry when flying.
Surge - Effect Slider
The Long G Surge Accel and Long G Surge Decel Effect Sliders control the forward movement during acceleration or reward movement during deceleration. If you don't have a surge actuator, it will be how much the platform pitches during acceleration and braking. The direction when accelerating or braking can be adjusted into two ways: For actuator platforms, you can reverse the surge actuator via the guide here. For platforms without a surge actuator, you can reverse the direction of the movement by changing the Max Telemetry to a negative value.
For gear shifts in racing sims, the placement of the Long G Surge Accel and Long G Surge Decel Effect Sliders will have the greatest impact on overall feeling. Since a gear shift is a momentary spike in deceleration telemetry, the father forward the platform is prior to the gear shift and the father back it needs to travel when receiving negative surge telemetry, the larger the felt "jerk" in motion can occur. This is due to the larger "gap" in between the forward position of the platform during acceleration and the rearward position of the platform during deceleration. Note: This gap in distance can be mitigated with increasing the Gear Smoothing Factor which will increase the amount of temporary surge telemetry smoothing to minimize the amount of movement during the gear shift.
-
For accelerating in racing sims, the higher the slider is set for Long G Surge Accel, the more forward motion will be felt when accelerating. This motion can be jarring when starting from a dead stop or when hitting the accelerator to leave a corner which can be mitigated by reducing the Long G Surge Accel Effect Slider and/or increasing the Surge Smoothing Effect. The amount of the Long G Surge Accel Effect Slider can also be adjusted based on the performance of the vehicle (ie. the more power in the vehicle, the more acceleration, thus more travel via a higher Long G Surge Accel setting). A mid-to-high range will mitigate excessive jarring motion while allowing for an increased amount of motion.
-
For decelerating in racing sims, the higher the slider is set for Long G Surge Decel, the more rearward motion will be felt when braking. Since braking telemetry is generally high, a higher setting for the Long G Surge Decel Effect Slider will allow for more travel in the platform and provide a wide range of felt fidelity. However, the increase in travel can result in jarring motion when braking hard to a complete stop or via a pit limiter. Utilizing additional Surge Effect Smoothing or the Auto Smoothing Low Speed button will help to mitigate these harsh motions.
-
If both the Long G Surge Accel and Long G Surge Decel Effect Sliders are set to high numbers, more jarring gear shifts could occur since there will be a greater distance between how much forward the platform will be when the Long G Surge Accel Effect Slider is set to a high value AND the Decel Effect Slider is also set to a high value which causes the platform to move more rearward during negative/decel telemetry.
-
Gear Smoothing Factor can be utilized to minimize the jarring gear shift when larger values are utilized; however, it might not be able to mitigate all the jarring motion. In addition, a larger amount of Gear Smoothing Factor, more than 50, can induce latency when returning to the throttle after a downshift.
-
Long G Surge Accel and Decel can be adjusted to feel the feathering of the throttle, the balance of movement during trail braking, initial starts and complete stops, and other effects. Do not limit your adjustments to just hard and fast starts and stops.
-
For flight sims, Long G Surge Accel and Long G Surge Decel is typically felt in the initial take off when accelerating and when braking during landing. Surge telemetry is rarely felt while flying unless in a jet with afterburners. Finally, some sims like DCS will represent spikes in negative surge telemetry when firing a cannon like in the A-10. Movement of the platform can be adjusted as normal; however, be careful when utilizing Surge Effect Smoothing as these effects can be muted easily.
-
For space sims like Elite Dangerous, there will be a incredible high spike in Surge telemetry when exiting the Frameshift Drive. For platforms with a Spike Filter, harsh motion will be mitigated. For platforms without a Spike Filter, Clipping Bad Telemetry (see the Clipping Bad Telemetry section below) might be needed to mitigate excessive movement.
Heave - Effect Slider
The Heave Effect Slider will control how much upward and downward motion the platform performs during heave events. Heave requires a critical balance between the Max Telemetry setting and the amount of the Vert G Heave Effect Slider. The proper Max Telemetry value for Heave will allow for the smaller details in road telemetry to be felt. These details can be lowered or strengthened via the Vert G Heave Effect Slider which will cause the platform to rise or fall more based on Heave telemetry.
-
A key tip for Heave is to go SLOW when adjusting values. A single digit can make the difference between a motion profile that feels to jarring and one that feels perfect. This is due to the fine relationship between the Heave Max Telemetry value and the Vert G Heave Effect Slider. Road telemetry can be small and lost in the telemetry against larger curb hits or other track variations that spike heave. Finding the fine balance between feeling the small details in the road and having it not feel harsh is a slow process.
-
Do not hesitate to adjust the Heave Max Telemetry value by a single digit up or down as well when working to find a good Heave setting. However, the Vert G Heave Effect Slider will need to be adjusted anytime the Heave Max Telemetry value changes.
-
The higher the value for the Vert G Heave Effect Slider, the more travel that will occur during heave which generally leads to jarring motion. Increasing Heave Smoothing Effects or slowly lowering the Vert G Heave Effect Slider will help to mitigate jarring heave motion.
-
For flight sims, heave telemetry is generally felt during landings as well as turbulence and can be easily adjusted with Heave Smoothing Effects.
Traction Loss - Effect Slider
The Traction Loss Effect Slider is a key factor in how far the platform will move left or right during traction loss. If you don't have a traction loss actuator, it will be how much the platform rolls during traction loss. The more travel available in traction loss, the more fidelity that can be utilized to tune in the initial feeling of traction loss into the platform. This is done through fine tuning the Traction Loss Max Telemetry and utilizing a higher value for the Traction Loss Effect Slider.
-
A major impact to Traction Loss motion is the Min Traction Loss Activation setting. Ensure Min Traction Loss Activation is set to 0 to allow for the full fidelity of traction loss telemetry to be utilized. Min Traction Loss Activation will not activate traction loss until the setting value is obtained leading to jarring/steppy motion.
-
Traction Loss can become very snappy quickly if the Max Telemetry value is too low. Raising the Traction Loss Max Telemetry value will allow for more travel via the Traction Loss Effect Slider.
-
Traction Loss Smoothing Effects can also be utilized to mitigate any jarring motion. However, too much Smoothing Effects can lead to small traction loss events not being felt or a latency in terms of responsiveness.
Platform Differences
Not every platform will feel the same. Differences in the spacing of the actuators, actuators vs non-actuator, servo drivers, and platform dimensions will all factor into the overall feeling of motion for the platform. There is simply not a "one size fits all" motion profile.
DOF Reality H/P3 vs H/P6: Sim Racing Studio will convert the motion from a profile created on a P6 to work on a P3 and vice versa. There is no specific platform motion profile for DOF Reality Platforms. A motion profiles created on a H3 will work on a H6. The key issue is the tuners ability to feel the Surge, Sway, and Heave axis on a H/P6 that is not present on a H/P3. Adjust might need to be made on these 3 axes if motion does not feel correct.
4 Vertical Actuators vs Additional Horizontal Actuators: Sway, Surge, and Traction Loss is converted into pitch or roll for platforms that do not have horizontal actuators (Sway = Roll; Surge = Pitch, Traction Loss = Roll). Platforms with horizontal actuators can utilize a larger value for Surge, Sway, and Traction Loss as these motions will have their own dedicated horizontal actuator. If the same Horizontal Actuator Effect Slider values are utilized on a 4 Vertical Actuator platform, it could result in excessive pitch or roll.
IMPORTANT: For an axis that does not have a dedicated horizontal actuator, it might be necessary to reduce the Effect Slider for Lat G Sway, Long G Surge Accel and Long G Surge Decel, or Traction Loss by 60% to mitigate excessive movement. For example:
-
If no Sway actuators, reduce the Sway Effect Slider from 14 to 6.
-
If no Surge actuator, reduce the Long G Surge Accel/Decel Effect Slider from 16 to 6.
-
If no Traction Loss actuator, reduce the Traction Loss Effect Slider from 18 to 7.
The same conversion should work when converting a 4 Vertical Actuator motion profile to a profile that will be utilized on a platform with Horizontal Actuator - increase the Sway, Surge, and Traction Loss Effect Sliders by 60%.
Actuator Stroke Size: The size of the actuator stroke will impact the overall feeling of a motion profile. A motion profile tuned on a 150mm actuator platform might feel too jarring on a 200mm actuator platform. A motion profile created on a 200mm actuator platform might feel too subdued on a 100mm actuator platform. This is due to the simple physics of an object having to travel the same % of distance in the same amount of time.
For example, while in a 150mm actuator platform, the surge telemetry from the game spikes to 15 while I accelerate out of the pits. Since I have the Max Telemetry set to 15 and the Surge Accel Effect Slider set to 20, the platform will move me the farthest forward possible by 75mm (since half is accel and the other half (75mm) is decel giving me the 150mm actuator stroke).
However, in a 200mm actuator platform, the same car, same telemetry and same settings, the platform will now move me the farthest forward possible to 100mm. 25 extra millimeters of travel. When I let off the throttle, the 150mm platform returns me back to neutral by moving reward 75mm whereas the 200mm platform moves me back 100mm. Thus, its very possible, the larger movement of 100mm feels jarring compared to the 75mm simply due to the extra 25mm of travel in the same amount of time.
This is something to consider when sharing motion profiles or when comparing your profiles to someone with a different actuator stroke platform.
Actuator Placement: The positioning of the actuator on a platform will impact the overall available angles of pitch and roll. The closer together the actuators are to each other, the greater the angle when at full pitch or roll. These changes in angle will impact the overall feeling of the profile. A simple change of 10cm can increase the angel by a couple degrees and result in a different feel in the motion profile. Differences in actuator placement is something to consider when sharing or comparing motion profiles.
MDBOX Tuning: Due to built in smoothing effects for MDBOX, it might not be necessary to utilize Effect Smoothing. Based on motion profiles created for PT Actuator platforms, it may be necessary to reduce the Effect Smoothing by 50%. Surge, Sway, and Traction Loss may require Effect Smoothing to be removed completely when comparing to motion profiles created on other platforms.
Clipping Bad Telemetry
SRS has the ability to clip excessive telemetry spikes from corrupted/buggy telemetry or extreme events such as hard crashes, hits, or rolling flips.
A few examples of buggy telemetry is that Elite Dangerous will spike surge to 9.6 million when exiting the frame-shift drive, IL-2 will spike surge and heave up to 300 when switching positions in a bomber, and DCS will spike sway when first attaching to a catapult on a carrier or taxiing on a runway. These events could be filtered to prevent the excessive movement and prevent them from dominating the other axes due to their extremely large telemetry values.
Extreme events could also be filtered that would be higher than expected telemetry like hard crashes, rolling flips, hard landings or other events that would normally lead to jarring motion. Accurate Max Telemetries should be utilized to ensure all intended motion isn't clipped.
WARNING: Clip Factor is a GLOBAL setting since its located in the config.ini file. Any setting made here will impact all games and could potential clip telemetry for titles in which its not intended.
The setting is in the SRS config.ini file which is located in the Documents/SimRacingStudio 2.0 folder. Default settings:
[MOTIONBOX]
pitch_clip_factor = 1000
roll_clip_factor = 1000
yaw_clip_factor = 1000
surge_clip_factor = 1000
sway_clip_factor = 1000
heave_clip_factor = 1000
traction_loss_clip_factor = 1000
The Clip Factor will clip any telemetry that is higher than the existing Max Telemetry for an axis MULTIPLIED by the Clip Factor. For example, if your Surge Max Telemetry is 20 and you set the Clip Factor to 3, any value the game send over 60 (3x20) will be clipped at 60. So if the games send a telemetry output for surge of 300, SRS will process the output only as 60, not as 300. Defaults Clip Factors are set to 1000 to prevent most clipping form occurring.
Reverse/Invert an Axis
By manually entering a negative number in the Max Telemetry field, the movement for that axis will be inverted. For example, if a game output has the platform turning the wrong way on the Yaw axis, entering a negative number into Max Telemetry for Yaw will reverse the Yaw movement.

Note: If you are wanting to reverse the direction of a horizontal surge actuator, follow the tutorial here instead.
Advanced Boost Tuning
The Boost multiplier SRS utilizes; the threshold at which it would begin; and the threshold in which it would be smoothed can be edited in the config.ini file. For example, the default boost_threshold for a DOF REALITY platform is 150 which is 15% of total movement. To boost just the small details, lower boost_threshold to 100 or even lower to 50. Change these settings only if the Boost slider in Platform settings isn't providing the desired strength of boost. The SRS config.ini can be found in the documents/simracingstudio 2.0 folder. The config.ini file can be edited in Notepad to adjust various settings in Sim Racing Studio. When making any changes to the config.ini file, SRS will need to be restarted. It’s recommended to make a backup copy prior to editing.
[MOTIONBOX] boost_multiplier - How much boost to apply if the threshold is met.
[DOF REALITY][PROSIMU] boost_threshold - When SRS calculates the new platform position, if the delta is smaller than this threshold, SRS will apply a boost_multiplier. The higher this number, boost gets applied to a larger range of delta movements and could cause jerkiness on large effects.
smoothing_threshold - When SRS calculates the new platform position, if the delta is larger than this threshold, SRS will apply a smoothing formula. The lower this threshold, more frequent smoothing gets applied and could cause some small effects to disappear.
Miscellaneous Tuning Tips
Shaker Kits, Transducers, and the Buttkicker Gamer 2
It's recommended to disable shaking when tuning as it will potentially mask the movement of the platform, specifically Heave. You need to be able to feel the motion movements without any distractions. Disabling shaker/vibrations enable you to feel the minute movements of the platform. Heave can especially be hidden by shake telemetry.
VR or Screens
It's much easier to adjust a motion profile on screens as you can easily observe the platform's movements. There is no recommendation in this guide for different settings based on screens or VR.